“Though we had a recipe in the family for a sourdough starter, I found that I wanted a tangier taste. I like sourdough bread that has that “sour” taste. Yes, I might have achieved this in time with our existing recipe, but it would have taken some aging of the starter. I didn’t want to wait!” – Calla Ferre
Yogurt Sourdough Starter with Wild Yeasts
Ingredients
- 3 Tablespoons Plain Greek Yogurt (Live Culture)
- 1 Cup 2% Milk
- 1 Cup Unbleached All-Purpose Flour
Instructions
- IMPORTANT: READ THROUGH THE ENTIRE RECIPE BEFORE PROCEEDING.
- Note: Use only glass or ceramic containers. Use only UNBLEACHED flour. Do not use half & half or heavy cream to feed your starter (it slows the fermentation process.)
- Allow your Greek yogurt to come to room temperature.
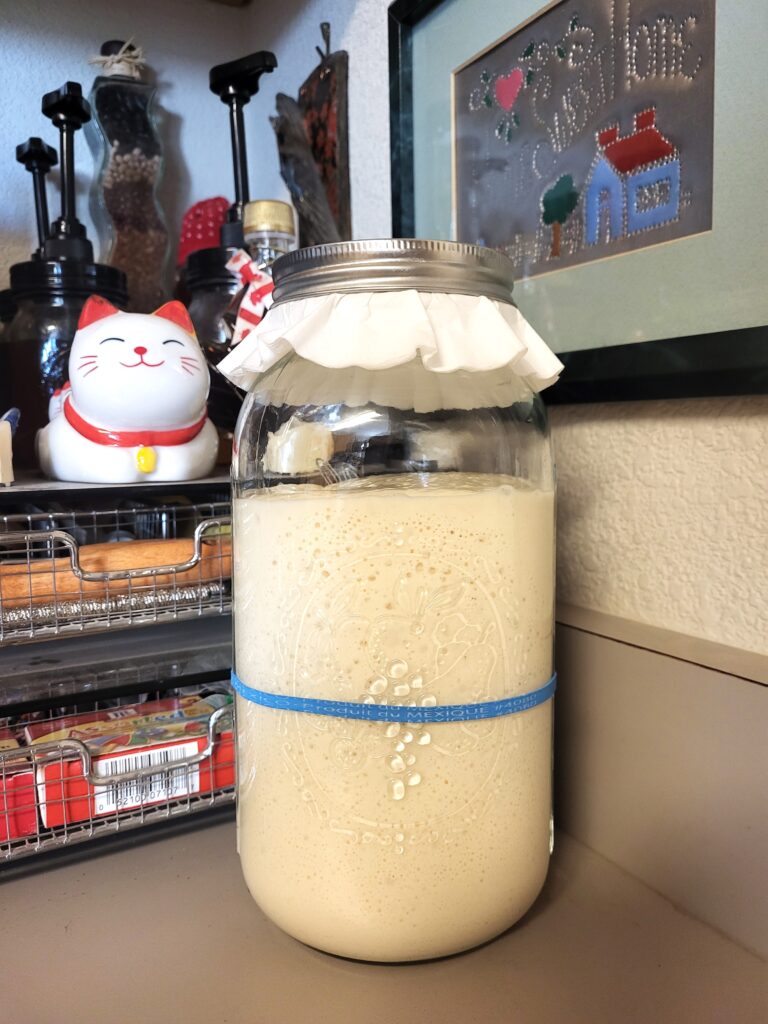
- Place a small saucepan over medium heat and warm the milk to between 95 and 100 degrees. Place the warmed milk into a medium-sized bowl. Add flour and mix until smooth. Stir in yogurt and mix well. Pour starter into a cleaned and dried 4 to 8 cup mason jar. Mark the level of the mixture. You can use a sharpie and draw on the jar or use a rubber band or piece of tape to mark the level. (I use a sharpie. It wipes off easily when needed.) Cover the jar with cheesecloth, linen cloth, or a round coffee filter. A coffee filter is preferred and can be held in place with a canning jar band (just the band, the filter is the “lid.”) This allows the starter to breath. You are trying to utilize the wild yeasts present in your flour and trying to capture the ones present in the environment.
- After 12 to 24 hours, you may or may not see any bubbles. At this point you should feed your starter, especially if you do not see any activity. If you see any clear liquid, stir it back into the starter. Any yellowish or grayish-beige liquid that rises to the top of your starter is the “hooch,” just stir it back in before using. If at any time you see mold or pink liquid, you need to discard and start over. This applies now or at any time in your starter’s future. Chances are once you have it going, if it is properly maintained, you should not have any problems.
- To initially feed your starter, place 1/2 cup flour into a medium-sized bowl and add 1/2 cup warmed (95 to 100 degree) milk. Whisk until smooth. Add to this bowl your starter and stir until well incorporated. Thoroughly clean and dry your jar. Place the mixture back into the clean jar and remark the level immediately. Remember to cover your starter with something that will allow it to breath.
- Continue to watch your starter. Marking the level allows you to see if your starter is growing/ fermenting. Do not refrigerate at this stage. The lowered temperatures will slow the fermentation process. How many days it takes to get your starter going depends on several factors. One determining factor is temperature. If your kitchen, or wherever your starter is residing, is cool, it will take longer to start. So if you find your starter is not bubbling or growing, try to find a warmer location. Warm, but not hot; you do not want to kill the yeasts. Let it sit, undisturbed, for 2 to 5 days. Once you see you have a good bubbling effect you will need to either start using some of your starter for baking or discard some and feed.
- If your starter has still not bubbled, you will need to discard some of the starter and give it a few more feedings. Double check that it is not sitting in too cool of a location and make sure you are using a cover that allows the starter to breath. Discard all but 1 cup starter and feed with 1 cup warmed milk and 1 cup flour. Clean your jar with each feeding. Allow it to sit for several hours to a couple of days. If by some chance there is still no activity, you can try smaller, more frequent feedings, up to a couple of times per day. You will need to discard the same amount as you are feeding. Discard first, then feed. If still no success, you can try a starter that uses yeast to get it started.
- Continue to maintain your starter. You do this by either using or discarding starter and then feeding. Replenish your starter every time you use it with equal amounts of warmed milk and flour. For example, if you used 1/2 cup starter, then replenish with 1/2 cup warmed milk and 1/2 cup flour. If you don’t bake much, the starter can be stored in the refrigerator. Just remember to take it out the night before baking. Sourdough starter should be at room temperature when it is fed or used.
- For general maintenance when you are not baking, discard 1 cup starter and replace with 1 cup warmed milk and 1 cup flour. After feeding, leave it at room temperature and allow bubbling to start, then place it back into the refrigerator. Feeding should be done at least once a month. If you bake weekly, it is my understanding that the starter should stay lively and active sitting on the counter. Personally, I prefer to keep mine in the refrigerator. Sourdough starters only get better with time.
- You can freeze some of your sourdough starter as a back-up in case you need to start again. Let it thaw completely at room temperature, then give it a feeding to reactivate and get it back to the bubbly stage.
- If you need to check if your starter is still active, measure out 1/4 cup starter and blend it with a mixture of 1/2 cup warm milk and 1/2 cup flour. Cover and let stand in warm place. It should bubble again in 4 to 8 hours if it is still active. This mixture can then be combined with the original starter. If it does not bubble, it is no longer active, and you must make a new starter.
- At any stage you may wish to add 1 tablespoon of plain Greek yogurt to the starter. This will help add sourness and decrease the pH level of the mixture, decreasing the chances of mold growth.
- When do I use my starter? For a sourdough product made without any added leavening you want your starter to be active enough that it doubles, or at least almost doubles, in size after feeding. That is when you know your starter has matured into adulthood. If your starter has not matured yet, you can still use it, but you will need to use a recipe that utilizes additional yeast. Look for recipes that call for “sourdough discard.” If you want your starter to mature more quickly, then do more feedings, making sure you discard as appropriate.
- The best time to use your starter is when it has been feed and is actively bubbling. Stir your starter before using so that the measurement of the starter is accurate.
- If you would like to use your sourdough starter in a favorite recipe you already have and enjoy, or just wish it was in a particular recipe, simply add 1/2 to 1 cup starter to the recipe and decrease the liquid by approximately half of the amount of starter used. For example: If you use 1/2 cup starter, decrease the liquid in the recipe by 1/4 cup.
- For the sourest taste when making bread, mix the room temperature starter with the liquid and half the flour called for in the recipe. Cover and allow to stand in a warm place until bubbly and very sour smelling, about 24 to 48 hours. Then combine this mixture with the rest of the ingredients in the recipe and proceed as directed.
- You can keep as much sourdough starter on hand as you want. Just remember that the jar or container you use needs to be at least twice as big as the amount of starter you initially placed in the jar. As mentioned, a mature starter will double in height as it ferments.
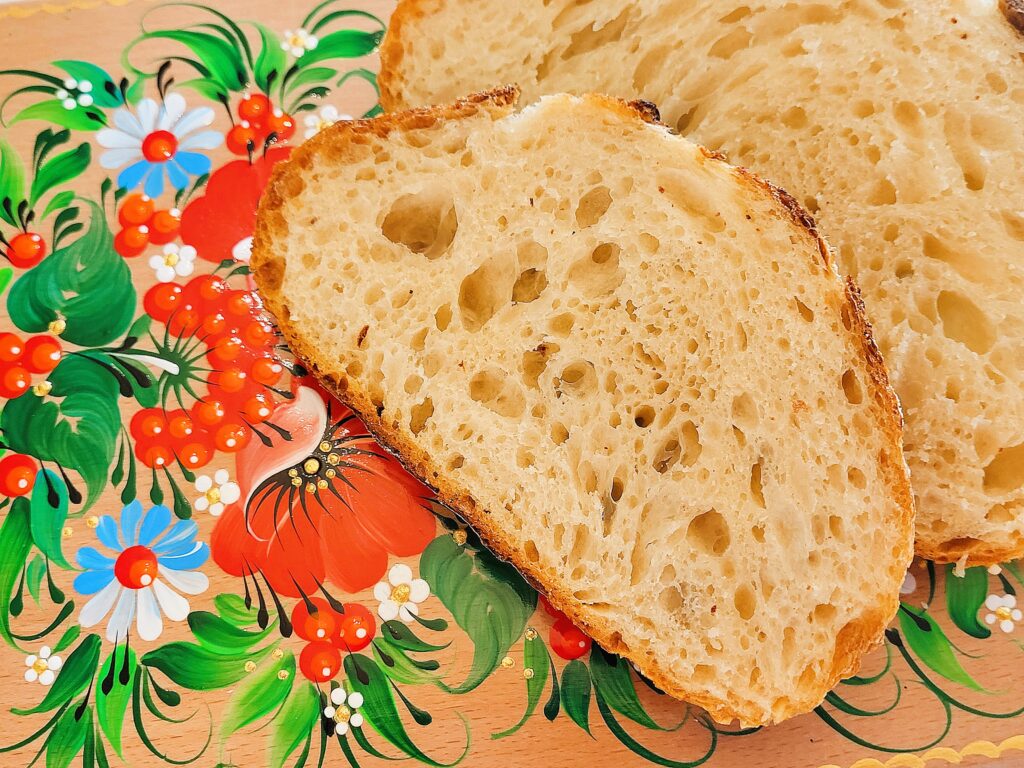
- Sourdough breads can vary in flavor due to differing wild yeasts and have a slightly “sour” taste due to the fermentation process. They tend to have a more complex flavor and be a bit chewier than yeast breads.
- Nice to know: Bread is done at an internal temperature of 190 degrees.
2021 Recipe – Calla Ferre
Related Recipes: